
General Tomitarō Horii
Tomitarō Horii, November 7, 1890 – November 23, 1942) was a major-general in the Imperial Japanese Army during World War II. He was an experienced infantry commander having served with distinction in the Second Sino-Japanese War. Born in Hyōgo Prefecture, Horii became an infantry officer following his graduation from the 23rd class of the Imperial Japanese Army Academy in 1911. He was later assigned to the headquarters of the Shangai Expeditionary Army during the January 28 Incident from January 28-March 4, 1932.
(Note: on the midnight of January 28th, Japanese carier aircraft bombed Shanghai in the first major aircraft carrier action in the Far East. Three thousand Japanese troops proceeded to attack various targets, such as the northern train station, around the city and began an invasion of the de facto Japanese settlement in Hongkew and other areas north of Suzhou Creek. In what was a surprising about-face for many, the 19th Route Army, who many had expected to leave after having been paid, stayed to put up a fierce resistance.
Though the opening battles of the conflict took place in the Hongkew district of the International Settlement, this soon spread outwards to much of Chinese-controlled Shanghai. The majority of the Concessions remained untouched by the conflict, and it was often the case that those in the Shanghai International Settlement would watch the war from the banks of Suzhou Creek, and could even visit the battle lines by virtue of their extraterritoriality. Being a metropolitan city with many foreign interests invested in it, other countries, such as the United States, Great Britain, and France attempted to negotiate a ceasefire between Japan and China. However, Japan refused, instead continuing to mobilize troops in the region. On February 12, American, British, and French representatives brokered a half-day cease fire for humanitarian relief to civilians caught in the crossfire. On 30 January, Chiang Kai-shek decided to temporarily relocate the capital from Nanjing to Luoyang as an emergency measure, since Nanjing's proximity to Shanghai could make it a target. On February 12, the Japanese issued another ultimatum, demanding that the Chinese Army retreat twenty kilometers from the border of Shanghai Concessions, a demand promptly refused by the Chinese forces. This only intensified fighting in Hongkew. The Japanese were still not able to take the city by the middle of February, and the number of Japanese troops was increased to nearly ninety thousand with the arrival of the 9th infantry Divisdion and the IJA 24th Mixed Brigade, supported by eighty warships and three hundred airplanes.)
From 1935-1937, he was attached to the IJA 12th Infantry Regiment, and became commander of the IJA 78th Infantry Regiment in 1938, after his promotion to colonel the previous year. Horii was appointed commander of the IJA 55th Division (part of the South East Force) in 1941.
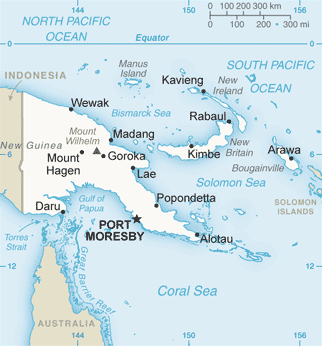
During the New Guinea campaign, Horii and his South Seas detachment were assigned to the invasion of Port Moresby, but were turned back by Allied forces during the Battle of the Coral Sea. As a result, after landing in the Buna-Garara area in July 1942, Horii led a column of 8,500 men of the IJA 144th Regiment overland on the Kokoda Trail over the treacherous Owen Stanley mountain range in an attempt to capture Port Moresby. After heavy fighting against a small Australian Army and Militia Force, however, the Japanese were delayed and defeated, and Horii was forced to withdraw with his surviving soldiers in the Kokoda Track campaign from September 1942.
Horii drowned while crossing the Kumusi River when his raft capsized in November 1942.
2. The Australian Commander
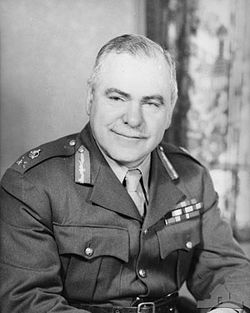
Field Marshal Sir Thomas Albert Blamey GBE, KCB, CMG, DSO, ED
Field Marshal Sir Thomas Albert Blamey GBE, KCB, CMG, DSO, ED (24 January 1884 – 27 May 1951) was an Australian General of the Second World War and the first, and to date only, Australian to attain the rank of Field Marshal. Blamey served in the First Australian Imperial Force (AIF) in the First World War. In mid-1914 Blamey had been in Britain on the staff of the Wessex Division. In November he sailed for Egypt, along with Harry Chauvel, to join the Australian contingent and became intelligence officer on the staff of the Australian 1st Division for the Battle of Gallipoli. During the landing at Anzac Cove, Blamey was sent to evaluate the need for reinforcements by Colonel M'Cay's 2nd Brigade on 400 Plateau. He confirmed that they were in such need, and the reinforcements were sent.
On the night of 13 May 1915, Blamey, in his capacity as intelligence officer, led a patrol consisting of himself, Sergeant J.H. Will and Bombardier A.A. Orchard, behind the Turkish lines in an effort to locate the Olive Grove guns that had been harassing the beach. Near Pine Ridge, an enemy party of eight Turks approached and one of them went to bayonet Orchard, so Blamey shot him with his revolver. In the action that followed, six Turks were killed. Blamey withdrew his patrol back to the Australian lines without locating the guns. Later, examination of the fuse setting on a dud round revealed that the guns were much further to the south than had been realised.
Blamey was always interested in technical innovation. He was instrumental in the adoption of the periscope rifle at Gallipoli, an instrument which he saw during an inspection of the front line. He arranged for the inventor, Lance Corporal W.C.B. Beech, to be seconded to division headquarters to develop the idea. Within a few days, the design was perfected and periscope rifles began to be used throughout the Australian trenches.
When the Chief of General Staff (CGS), Lieutenant General Sir Cyril Brudenell White, retired in 1923, Blamey was expected to succeed him as CGS as he had as chief of staff of the Australian Corps in France. However there were objections from more senior officers, so the Inspector General, Lieutenant General Sir Harry Chauvel, was made CGS as well, and Blamey was given the new post of Second CGS, in which he performed most of the duties of CGS.On 1 September 1925, Blamey transferred from the Permanent Military Forces to the Militia, and on 1 May 1926 he took command of the 10th Infantry Brigade, part of the 3rd Division. Blamey took command of the division on 23 March 1931 and was promoted to major-general, one of only four militia officers promoted to this rank between 1929 and 1939. In 1937 he was transferred to the unattached list.
On 13 October 1939, Blamey was promoted lieutenant-general and appointed to command the 6th division, the first formation of the newSecond Australian Imperial Force. Generals John Lavarack and Gordon bennett also were considered for the post, and had their supporters, but Blamey was the preferred choice of Prime Minister Robert Menzies. Menzies limited Blamey's choice of commanders by insisting that they be selected from the Militia rather than the Permanaent Military Forces.
Blamey travelled to the Middle-East with the 2nd AIF as its commander. He occasionally clashed with the British Commanders-in-Chief Middle East, General Archibald Wavell and his successor, General Claude Auchinleck, over the employment of Australian forces. He refused to allow his troops to perform police duties in Palestine, and insisted that they remain together as cohesive units, and no Australian forces were to be deployed or engaged without the prior consent of the Australian government. The government strengthened his hand by promoting him to full general, and Blamey was appointed Deputy Commander-in-Chief Middle East
However, Blamey was not inflexible and permitted Australian units to be detached when there was a genuine military need. Because the situation in the Middle East tended to lurch from crisis to crisis, this resulted in his troops becoming widely scattered at times. Blamey has been criticised for allowing Australian troops to be sent on a dangerous mission to Greece after he had been told that Menzies had approved and Menzies had been informed that Blamey had approved. Blamey was under no illusions about the odds of success and immediately prepared plans for an evacuation. Blamey's foresight and determination saved many of his men but he lost credibility when he chose his son to fill the one remaining seat on the aircraft carrying him out of Greece. He was Mentioned in Despatches, and awarded the Greek Military Cross, First Class.
In the Syrian campaign (against the Vichy French), Blamey took decisive action to resolve the command difficulties caused by General Henry Maitland Wilson's attempt to direct the fighting from the King David Hotel in Jerusalem by interposing Lieutenant-General John Lavarack's I Corps headquarters.
Later Blamey forced another showdown with Auchinleck over his insistence that the Australian 9th Division be withdrawn from Tobruk, allowing his command to be concentrated in Syria. Blamey was supported by Prime Minister John Curtin and Auchinleck was forced to back down. For his campaigns in the Middle East, he was created a Knight Commander of the Order of the Bath (KCB) on 1 January 1942.
In 1942, Blamey was recalled to Australia to become the Commander-in-Chief Australian Military Forces (AMF), and then Commander of Allied Land Forces as well. Some of Blamey's most controversial actions concern the period after the Japanese declared war, and United States General Douglas MacArthur retreated to Australia.


.jpg/200px-AIF_(AWM_ARTV04333).jpg)


